GROWING CLVIA SEEDS
Harvesting Clivia Seeds
Hi there everyone, if you are visiting this page you are probably looking to learn more about growing clivia seeds.
Well, let me tell you more..
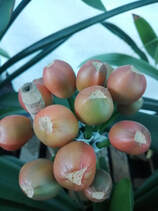
After your spectacular show of clivia flowers you will notice small berries will start forming, after 7-8 months, these berries will grow bigger, start coloring up and this is when you know they are ready for harvesting(Please note that these berries are not edible for pets or humans).
As soon as these berries are starting to feel soft to the touch you can start harvesting them, even if they are not fully colored up. This can be anytime from May till July, depending on where you are located. Cut the seed stems just above the point where it grows out of the plant then lightly dust the wound with cinnamon powder to prevent possible fungi from developing. If you feel the seeds are still to green, they can be hanged upside down in a dark cool place where they will color up very quickly or you can store them in brown paper bags for about 2 weeks.
Cleaning The Seeds
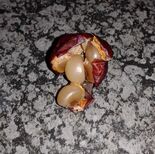
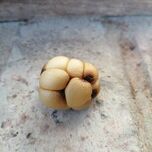
After harvesting the Berries you can start peeling the skin and removing the seeds from the membranes inside. Each berry can contain anything from 1 to 36 seeds, so as you can figure you will have a lot of seeds from just one plant.
Next you can rinse these seeds in a solution of bleach and water (10ml bleach per 10 liters of water) to sterilize and clean them from any bacteria to insure healthy germination. Also note it is important to wash your hands before handling seeds. Below is a few photos of the seeds cleaned.
Hi there everyone, if you are visiting this page you are probably looking to learn more about growing clivia seeds.
Well, let me tell you more..
After your spectacular show of clivia flowers you will notice small berries will start forming, after 7-8 months, these berries will grow bigger, start coloring up and this is when you know they are ready for harvesting(Please note that these berries are not edible for pets or humans).
As soon as these berries are starting to feel soft to the touch you can start harvesting them, even if they are not fully colored up. This can be anytime from May till July, depending on where you are located. Cut the seed stems just above the point where it grows out of the plant then lightly dust the wound with cinnamon powder to prevent possible fungi from developing. If you feel the seeds are still to green, they can be hanged upside down in a dark cool place where they will color up very quickly or you can store them in brown paper bags for about 2 weeks.
Cleaning The Seeds
After harvesting the Berries you can start peeling the skin and removing the seeds from the membranes inside. Each berry can contain anything from 1 to 36 seeds, so as you can figure you will have a lot of seeds from just one plant.
Next you can rinse these seeds in a solution of bleach and water (10ml bleach per 10 liters of water) to sterilize and clean them from any bacteria to insure healthy germination. Also note it is important to wash your hands before handling seeds. Below is a few photos of the seeds cleaned.

|
|
|
Planting Seeds
Alright so now is the exciting times, SOWING THE SEEDS!!
There's two methods you can use to do this.
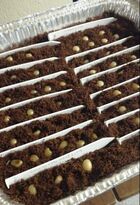
Method 1: Sowing in sealed containers
You will need the following:
Cleaned seeds
An ice cream container or tin lasagna containers with lids
Peat block
Bleach solution (1ml to 10litres of water)
Soak the peat block in water till it's dissolved, squeeze out all access moisture as you want the peat to be moist but not wet.
Fill the container halfway with the damp peat, then gently push the seeds halfway into the peat(Do not cover the seeds completely).
Give it about 2 to 3 sprays with the bleach solution and cover with the lid and put in a warm location (not in direct sun light), check every 15 to 20 days if it's still moist enough.
Seedlings can be transplanted out in pots once it have its first real leaf
Alright so now is the exciting times, SOWING THE SEEDS!!
There's two methods you can use to do this.
Method 1: Sowing in sealed containers
You will need the following:
Cleaned seeds
An ice cream container or tin lasagna containers with lids
Peat block
Bleach solution (1ml to 10litres of water)
Soak the peat block in water till it's dissolved, squeeze out all access moisture as you want the peat to be moist but not wet.
Fill the container halfway with the damp peat, then gently push the seeds halfway into the peat(Do not cover the seeds completely).
Give it about 2 to 3 sprays with the bleach solution and cover with the lid and put in a warm location (not in direct sun light), check every 15 to 20 days if it's still moist enough.
Seedlings can be transplanted out in pots once it have its first real leaf
|
|
Method 2: Sowing directly outside
You basically do the same as above accept these seeds are sown in a well drained seedling or potting mix in seed trays or directly in the garden beds. Best results is from August when temperature warms up.
Cleaned seeds can be stored in a fridge till then.
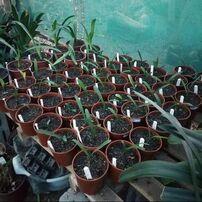
Repotting seedlings
After seeds have germinated, you can repot seedling when they have 2 to 3 leaves.
The best time to do this is from March till May
You basically do the same as above accept these seeds are sown in a well drained seedling or potting mix in seed trays or directly in the garden beds. Best results is from August when temperature warms up.
Cleaned seeds can be stored in a fridge till then.
Repotting seedlings
After seeds have germinated, you can repot seedling when they have 2 to 3 leaves.
The best time to do this is from March till May
